Get Started With Threlte
Table of Contents
Introduction
According the the official website defination, Threlte is a renderer and component library for Svelte to build and render three.js scenes declaratively and state-driven in Svelte apps.
It’s inspired by the sensible defaults of react-three-fiber, the simplicity and effectiveness of Sveltes reactivity model and Svelte Cubed.
It provides strictly typed components to quickly and easily build three.js scenes with deep reactivity and interactivity out-of-the-box.
It also aims to provide the building blocks to quickly extend Threlte when it’s needed.
Packages Included
- @threlte/core
- @threlte/extras
- @threlte/gltf
- @threlte/rapier
- @threlte/theatre
Installation
Firstly, you need to install NodeJs to use node package manager
After that you need to cd into your Documents folder or any folder of your choice and run the following command:
npm create threlte my-project
Then you need to cd into your project folder that you just created, to do that you have to do,
cd my-project
Then you need to install all the dependencies of the project by running the following command:
npm install
Get Started with the Scene One
Open up +page.svelte clear up everything and replace it with the following code:
<script lang="ts">
	import SceneOne from '$lib/components/Scene-One.svelte';
	import { Canvas } from '@threlte/core';
</script>

<section>
	<h2>Scene One</h2>
	<div class="canvas-wrapper">
		<Canvas>
			<SceneOne />
		</Canvas>
	</div>
</section>

<style>
	section {
		display: flex;
		flex-direction: column;
		align-items: center;
	}
	.canvas-wrapper {
		width: 100%;
		border: 1px solid black;
		height: 300px;
	}
</style>
Explanation on Starting Variables
Now create a new file called Scene-One.svelte inside the lib/components folder and add the following code:
<script lang="ts">
	import { useFrame } from '@threlte/core';
	import { tweened } from 'svelte/motion';
	import { cubicOut } from 'svelte/easing';

	const tweenedPos = tweened(3, { duration: 1000, easing: cubicOut });

	let rotationPerFrame = 0;
	useFrame(() => {
		rotationPerFrame += 0.05;
	});
</script>
These are the necessary imports that we need to use in our scene.
first one is useFrame which is used to update the scene on every frame. so if you like to make any changes per tick you can use this.
for example I’m using this to rotate the icosahedron on every frame. by adding 0.05 to the rotationPerFrame variable.
secondly we are using tweened from svelte/motion to animate the position of the cube, with the help of cubicOut animation from svelte/easing liberary.
Now let’s add something to the scene, add the following code to the Scene-One.svelte file:
Add a Prespective Camera
<PerspectiveCamera position={{ x: 0, y: 0, z: 20 }} lookAt={{ y: 0 }} fov={15} />
This is going to add the camera to the scene, with the position of x: 0, y: 0, z: 20 and fov of 15.
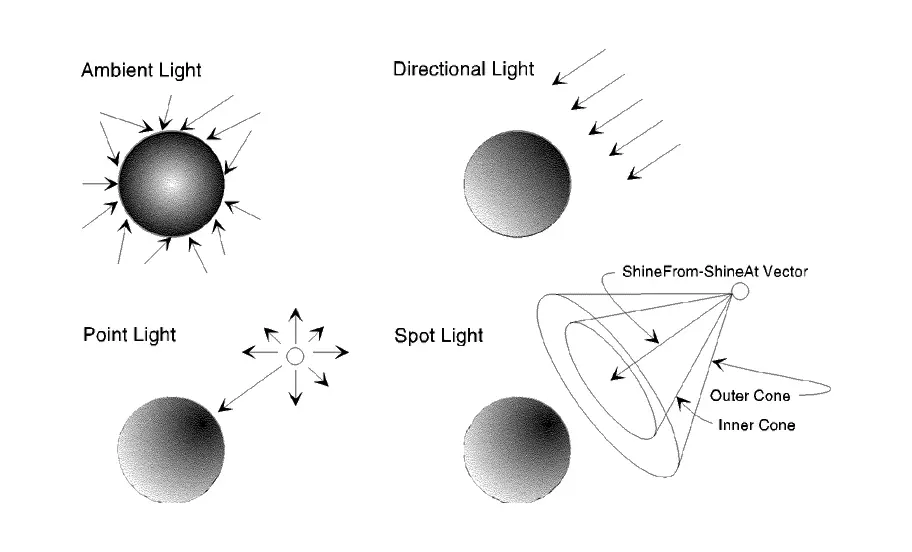
Add a Ambient Light
<AmbientLight intensity={0.3} />
This is going to add a AmbientLight to the scene with the intensity of 0.3.
Add an Ambient Light
<AmbientLight intensity={0.3} />
This is going to add a AmbientLight to the scene with the intensity of 0.3.
Add a Point Light
<PointLight position={{ x: 0, y: 0, z: 20 }} intensity={0.8} />
This is going to add a PointLight to the scene with the position of x: 0, y: 0, z: 20 and the intensity of 0.8.
Keep in mind Point light is extremely cpu intensive, so use it wisely.

Add a Directional Light
If you want to have a light that is coming from a specific direction like Sun Light, you can use DirectionalLight for that, it is less cpu intensive than PointLight.
<DirectionalLight position={{ x: 0, y: 0, z: 5 }} />
Add an Icosahedron
<Mesh
	geometry={new IcosahedronGeometry(1, 0)}
	material={new MeshStandardMaterial()}
/>
Now the fun part begins, we are going to make this IcoSphere more interesting by adding some animations or interactions to it.
Let first start with changing the color of the IcoSphere, add the following code to the <Mesh /> component:
<Mesh
    geometry={new IcosahedronGeometry(1, 0)}
    material={new MeshStandardMaterial({ color: 'hotpink' })}
/>
we can make this hotpink color as a variable so we can change its color later on, add the following code to the <script> tag:
let icoColor = 'hotpink';
Now we can use this variable to change the color of the IcoSphere, add the following code to the <Mesh /> component:
<Mesh
    geometry={new IcosahedronGeometry(1, 0)}
    material={new MeshStandardMaterial({ color: icoColor })}
/>
Now the color is change, we should make this IcoSphere rotate every frame,
remember we have created a variable called rotationPerFrame in the <script> tag, we can use that to rotate the IcoSphere, add the following code to the <Mesh /> component:
<Mesh
    geometry={new IcosahedronGeometry(1, 0)}
    material={new MeshStandardMaterial({ color: icoColor })}
    rotation={{ y: rotationPerFrame, x: 0, z: 0 }}
/>
Now you have to add interactive prop to the on:click prop to it to add some functionality to it.
Also remember we have added a tweenedPos variable in the <script> tag, we can use that to animate the position of the IcoSphere, add the following code to the <Mesh /> component:
we had give it the value of 3, we can use that prop to give it the initial position.
<Mesh
	geometry={new IcosahedronGeometry(1, 0)}
	material={new MeshStandardMaterial({ color: icoColor })}
	position={{ x: $tweenedPos }}
	rotation={{ y: rotationPerFrame, x: 0, z: 0 }}
	interactive
	on:click={() => {
		icoColor = icoColor === 'hotpink' ? 'coral' : 'hotpink';
		$tweenedPos = $tweenedPos > 0 ? -3 : 3;
	}}
/>
Now we have added the on:click prop to the <Mesh /> component, which is going to change the color of the IcoSphere and alsochange the position of the IcoSphere, by changing the value of the tweenedPos variable. and we added the easeOut animation to it, so it will animate the position of the IcoSphere.
So this is the tutorial on how to create interactive 3D elements with Svelte and Three.js, You can sign up for the newsletter, to get updated on the latest tutorials and articles.
Thankyou